> ## Documentation Index
> Fetch the complete documentation index at: https://docs.mailchannels.com/llms.txt
> Use this file to discover all available pages before exploring further.
# Setup MailEnable
> Configure MailEnable to relay outbound mail through MailChannels Outbound Filtering using smart host settings, SASL authentication, and sender identification headers.
## Prerequisites
* Supported Versions: MailEnable v8+
* Launch the MailEnable Administration Console from your server
* You should see a hierarchical view on the left-hand side
* An active subscription to MailChannels and your SMTP Username & Password[(Host Console)](https://console.mailchannels.net)
## Step 1: Access MailEnable Administration Console
### 1. Navigate to SMTP Properties:
* In the left-hand tree, navigate to `Servers` > `localhost` > `Connectors` > `SMTP`
* Right-click on `SMTP` and select `Properties`
## Step 2: Configure SMTP Connector
### 1. Setup the Smarthost:
* Click on the `Smart Host` tab
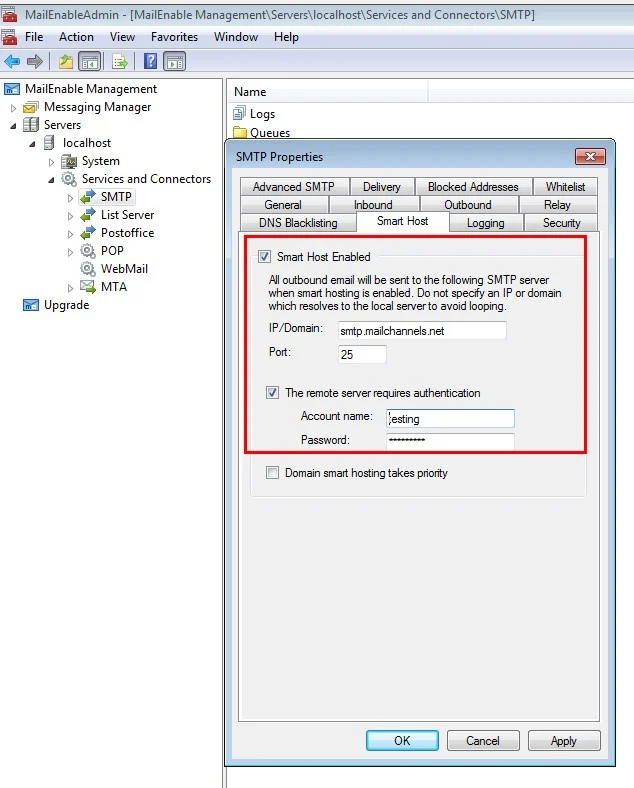 * Check the box for `Smart Host Enabled`
* Enter `smtp.mailchannels.net` in the `IP/Domain:` field.
* Set the `Port` to `587`. *(25 & 2525 available if needed)*
* Check the box for `The remote server requires authentication`.
* Enter your MailChannels SMTP Username and Password into the `Account:` and `Password:` fields
* `Apply` and `OK` your changes
## Step 3: Add Authentication Headers
* Click on the `Advanced SMTP` tab
* Check the box under Header Fixing for `Add Required Headers for Authenticated Senders if needed`
* `Apply` and `OK` your changes
## Step 4: Configure DNS Records
* Verify that your domain’s DNS settings include the correct MX records pointing to your MailEnable server
* Update or add [SPF](https://support.mailchannels.com/hc/en-us/articles/200262610-Set-up-SPF-Records), [DKIM](https://www.mailenable.com/documentation/10.0/Standard/DKIM.html), [Domain Lockdown](https://support.mailchannels.com/hc/en-us/articles/16918954360845-Secure-your-domain-name-against-spoofing-with-Domain-Lockdown) and [DMARC](https://support.mailchannels.com/hc/en-us/articles/360045526931-How-does-MailChannels-enforce-DMARC-policy) records as recommended by MailChannels.
*(SPF and Domain Lockdown records are required before relaying message traffic through MailChannels and should be in place before you perform any test sending. DKIM and Dmarc are highly recommended before going live)*
## Step 5: Send a Test Message
### 1. Send a Test Email:
* Use any email client to send a test email from a mailbox hosted on your MailEnable server
* Verify if the email is successfully delivered without errors
* Check the `Outbound` > `Activity` > `LogSearch` area of your [Host Console](https://console.mailchannels.net/) for status, response codes and other useful details about your message traffic
### 2. Check Logs for Errors:
* If the email fails to send, check the SMTP logs
* Logs are located in `Program Files\Mail Enable\Logging\SMTP`.
* If logs are unclear or you require some additional help, please reach out to our Support Team: [support@mailchannels.com](mailto:support@mailchannels.com)
## Optimizations, Resources and Best Practices
* [Official MailEnable SMTP Connector Guide](https://www.mailenable.com/documentation/10.0/Standard/SMTP_Connector.html)
* Check the box for `Smart Host Enabled`
* Enter `smtp.mailchannels.net` in the `IP/Domain:` field.
* Set the `Port` to `587`. *(25 & 2525 available if needed)*
* Check the box for `The remote server requires authentication`.
* Enter your MailChannels SMTP Username and Password into the `Account:` and `Password:` fields
* `Apply` and `OK` your changes
## Step 3: Add Authentication Headers
* Click on the `Advanced SMTP` tab
* Check the box under Header Fixing for `Add Required Headers for Authenticated Senders if needed`
* `Apply` and `OK` your changes
## Step 4: Configure DNS Records
* Verify that your domain’s DNS settings include the correct MX records pointing to your MailEnable server
* Update or add [SPF](https://support.mailchannels.com/hc/en-us/articles/200262610-Set-up-SPF-Records), [DKIM](https://www.mailenable.com/documentation/10.0/Standard/DKIM.html), [Domain Lockdown](https://support.mailchannels.com/hc/en-us/articles/16918954360845-Secure-your-domain-name-against-spoofing-with-Domain-Lockdown) and [DMARC](https://support.mailchannels.com/hc/en-us/articles/360045526931-How-does-MailChannels-enforce-DMARC-policy) records as recommended by MailChannels.
*(SPF and Domain Lockdown records are required before relaying message traffic through MailChannels and should be in place before you perform any test sending. DKIM and Dmarc are highly recommended before going live)*
## Step 5: Send a Test Message
### 1. Send a Test Email:
* Use any email client to send a test email from a mailbox hosted on your MailEnable server
* Verify if the email is successfully delivered without errors
* Check the `Outbound` > `Activity` > `LogSearch` area of your [Host Console](https://console.mailchannels.net/) for status, response codes and other useful details about your message traffic
### 2. Check Logs for Errors:
* If the email fails to send, check the SMTP logs
* Logs are located in `Program Files\Mail Enable\Logging\SMTP`.
* If logs are unclear or you require some additional help, please reach out to our Support Team: [support@mailchannels.com](mailto:support@mailchannels.com)
## Optimizations, Resources and Best Practices
* [Official MailEnable SMTP Connector Guide](https://www.mailenable.com/documentation/10.0/Standard/SMTP_Connector.html)